 HDR is a bit of a buzz word in photography in the last while and there is much debate about it, whether it’s good or bad, appropriate or not, or even real photography or not. Even right here on Digital Photography School, you can find articles for, and against, doing HDR. I’m not going to get into any of that today, I’m just going to speak to those of you that do enjoy doing it and would like some tips for doing HDR sunsets, which is one of the toughest subjects to handle with this technique. So if you are anti HDR, just carry on, or perhaps this may sway you a little to want to try it.
HDR or High Dynamic Range, why it’s great for sunsets
When we talk about a scene having a High Dynamic Range, it simply means that there is wide range of contrast from the darkest area, to the brightest area. Sunsets exemplify that because we are usually shooting into the sun, a bright light source, and the landscape is often so dark it’s in a silhouette. By shooting correctly and processing well you can achieve a result that has detail in both those areas.
Tips for shooting the right images
There are a few things you need to get right in camera when you’re at the scene so follow these tips.
- Make sure to bracket your images far enough on both ends of the exposure scale , but dark enough and bright enough. What I mean by that is your darkest image should have a gap on the histogram to the right side (meaning there are no white areas, and no blinkies on your camera display) and your brightest image should have a gap on the histgram’s left edge (there are no black areas)
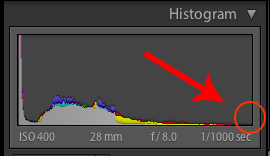
Your darkest image’s histogram should look something like this with a gap on the right side.

Your brightest image’s histogram should look something like this with a gap on the left side.
- shoot raw files, they will give you the most amount of data to work with
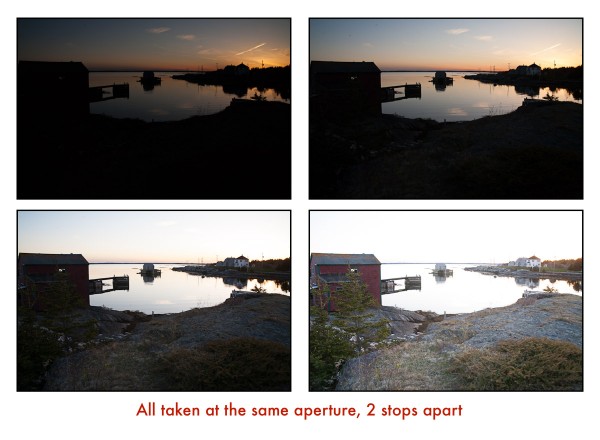
- bracket your images 2 stops apart, because assuming you followed the tip above and have shot raw files, they carry plenty of data at least 2 stops either direction so shooting 1 stop apart will cause you to shoot more images than you need and just end up bogging down your computer in processing, OR you won’t shoot enough range
- shoot at low ISO, ideally 100. HDR processing introduces a lot of noise into your image so start with a lower ISO to minimize that problem.
- use a tripod as your shutter speeds will likely be fairly slow, and it also allows you to get all your bracketed shots perfectly aligned for a sharper final image. For the image above my settings are: ISO 400 (I did that because the light was fading fast and I wanted to shoot a bit faster), f8 at 1/1000, 1/250, 1/60, and 1/15th of a second
- use a remote trigger (cable release) to fire the camera, so you aren’t touching it during the exposures to reduce camera shake and a blurry image
- change only the shutter speed, NEVER the aperture. If you change the aperture in your bracketed images you are changing the focus from one to the next and your resulting blended HDR image will likely have some odd focus issues or halos.
This is what your bracketed set should look like. Good coverage on both the dark and light ends of the light scale. Notice the darkest image has lots of nice colour in the sky, whereas the brightest one has a ton of detail in the foreground area but none in the sky. This is normal, and exactly what you want.
Tips for processing the bracketed images
I use Photomatix as my HDR tone mapping software of touch. I find it gives me the flexibility to be able to produce both natural looking and surreal results. Whatever software you use for your tone mapping, try some of these tips for better sunset results:
- if there are moving clouds in the scene or trees blowing, use the software’s deghosting feature to remove of minimize those. It will make the final result look much sharper.
- when adjusting the tones in your software of choice keep your saturation settings low, don’t overdo it. In Photomatix I always (let me repeat that word), ALWAYS, keep my saturation under 50! When I pull it back into Lightroom afterwards and punch my blacks and contrast up the saturation increases with it, so it’s really easy to take it too far.
- watch the sky for halos (white areas glowing around the edges of things) especially if the sky cloud free against something dark like a tree or building. Halos are generally an affect that is thought of as poorly done HDR and why many people do not like the technique. Sure you can create a surreal look but I do think you can take it too far. Just as an example, here’s what “too far” looks like in my opinion. Do NOT make something that looks like this. Notice the extreme noise and graininess in the sky? This is caused by pushing too far.

Over done, do not do this!

This is straight out of Photomatix. Notice how flat and drab looking it is?
Often when shooting a landscape in HDR you’ll find that one area looks good if you push it a little further, but the other half doesn’t. Such is the case here. I find that I can push the land and foreground area a bit further to get more detail out, but then the sky looks bad or has halos. So you can mask back in one image of the sky if necessary, or blend the two together using Photoshop and pick which areas are best from each version. See below for an example. Version #1 processed for a nicely blended sky.

Version #1 processed for the sky
Version #2 in the middle is our over processed one from above but the foreground land looks pretty good.

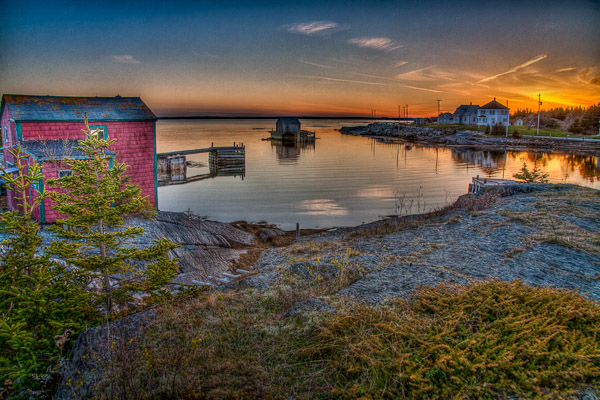
Final blended version
The final version above is #1 and 2 above blended together using layers and masks in Photoshop. Notice how it takes the best of both images and combines them.
HDR sunset with a person?
Let’s look at another example. Some people say you can’t do HDR when you have a person in the shot. Can you? Take a look at the images below and you tell me if it works or not.
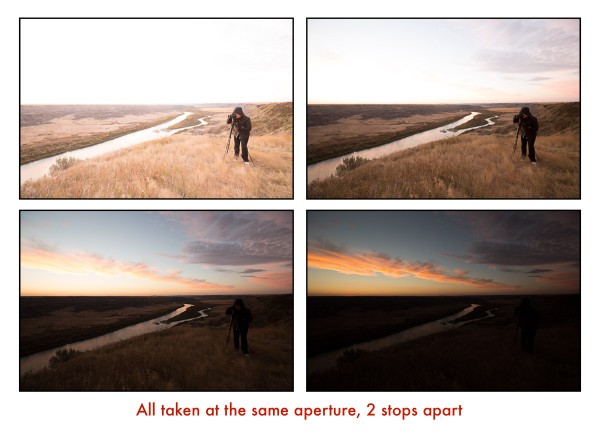
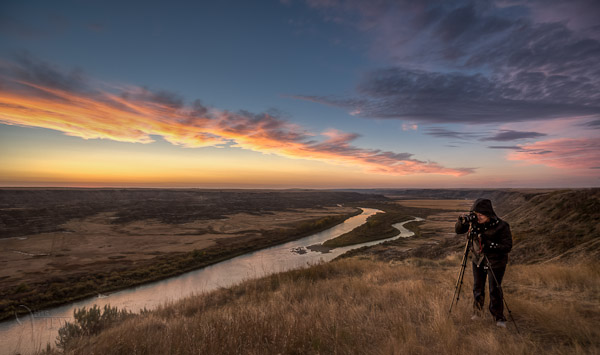
There has been no image blending on this final version, just tone mapped and tweaked in Lightroom. I do confess though that this is not sunset, it is in fact a sunrise. But you get the idea, it’s the same because the sun is on the horizon in both cases.
How to handle a sky with lots of fluffy clouds
Another common problem when doing HDR for landscapes is when there are lots of big white fluffy clouds, they often tend to come out looking rather dark and foreboding. This is another good time to use the masking technique. In the images below I’ve processed the HDR how I like it for the foreground, nice and crisp. But my clouds have gone too dark. If I choose to pull back on the surreal look I lose that nice detail in the grass and pyramids. So I’ve taken the best of both and combined them once again.


Processed for the grass, sky is overdone
Version #1 above, processed for detail in the grass, but notice how dark the clouds are. They were not storm clouds but they sure look like it now. I want to get those soft fluffy ones back so I took one of the original single images from my bracketed series and combined it with this one to get the following final image which I think is much softer looking.

Processed twice and blended – final version.
Final blended version above. See the difference? It’s subtle but I think it makes a huge difference to the final appearance and feel of the image.
Summary and action plan
So where to go from here is to get out and try this for yourself. If you have some bracketed series that you’ve already shot you can go back and try processing them with these tips and see if it makes a difference. Or better yet, get out there and go shoot tonight’s sunset or tomorrow’s sunrise if you’re a morning person.
One other unrelated tip I’ll leave you to get better sunsets in general is to find an interesting subject in front of your sunset. Notice in these cases I have a great scene or something with a great foreground or shape (pyramids) to add some interest to the scene. A plain old sunset on a flat horizon is really not that interesting no matter how great the colours are. So find a suitable scene during the daytime and come back at dusk and work your magic on it.
If you want some other HDR tips you can read 10 Tips on how to do HDR photos without a tripod, for those times when you don’t have one with you, or you aren’t allowed to use it.
Have you got other little secrets or tips for creating HDR sunsets? I’d love it if you shared with in the comments below and as always if you have a question please ask as I read and answer ALL the comments.


Some Older Comments