
Symmetry is a powerful compositional device, but how does it work? When should you use it? And, most importantly, how can you use symmetry in photography for amazing results?
In this article, I share everything you need to know to get started with symmetrical photography. I also offer some practical tips – so you can start taking your compositions to the next level, fast.
Ready to become a symmetry master? Then let’s jump right in, starting with the basics:
What is symmetry in photography?
Symmetry is a compositional device that features a subject reflected across an imaginary axis. In general, the main subject sits smack-dab in the center of the frame, like this:

However, as I discuss later on in this article, a centered subject isn’t always necessary (and you can use off-center symmetrical subjects for compelling results).
Note that photographers, especially photographers engaging with composition for the first time, tend to avoid symmetrical compositions. The ever-popular rule of thirds emphasizes the value of asymmetry, so serious beginners try to work with the rule of thirds gridlines in the hopes of creating dynamic, well-balanced photos.
But here’s the thing:
While poorly used symmetry can result in boring, static compositions, symmetry – when correctly applied – creates balanced, intense, even in-your-face images.
Symmetry vs the rule of thirds
As I mentioned in the previous section, beginner photographers tend to rely heavily on the rule of thirds, an oft-repeated compositional technique that uses a handy grid overlay:

The idea is that you position key elements a third of the way into the frame, which gives the overall composition a sense of balance, while also preventing the shot from becoming too static.
But while the rule of thirds is great, and it’s often highly effective, it can get a bit repetitive. After all, using the same compositional framework over and over again will create similar images. Plus, the rule of thirds rarely makes for intense images; by positioning the subject off-center, you often take away from any in-your-face effects.
Enter symmetry, which is a solid alternative to the rule of thirds. (Despite its name, the rule of thirds isn’t actually a rule, just a guideline!) Of course, you shouldn’t use symmetrical composition tactics all the time – as with the rule of thirds, you’ll eventually start producing repetitive images – but by using symmetry now and again, you can inject plenty of shock and awe into your portfolio.

How to use symmetry in your photos
When you’re starting out with symmetrical photography, I encourage you to look for two things:
- Symmetrical subjects. I mean subjects that reflect across an axis, such as people, trees, and buildings.
- Reflective objects. I’m talking about water, metal, glass, and anything else you can find that reflects the scene.
These two elements – symmetrical subjects and reflective objects – are your symmetry bread and butter. As long as you have one or the other, you can pull off a symmetrical composition.
So when you’re out with your camera and you’re aiming to capture a powerful photo, stop, take a deep breath, and look around.
If you can find a symmetrical subject, such as an interesting building, do what you can to position it in the dead center of the frame. For the best results, line up your shot so that your sensor is parallel with the front of the subject, and (generally) aim to fill a large chunk of the frame with the subject’s mass.
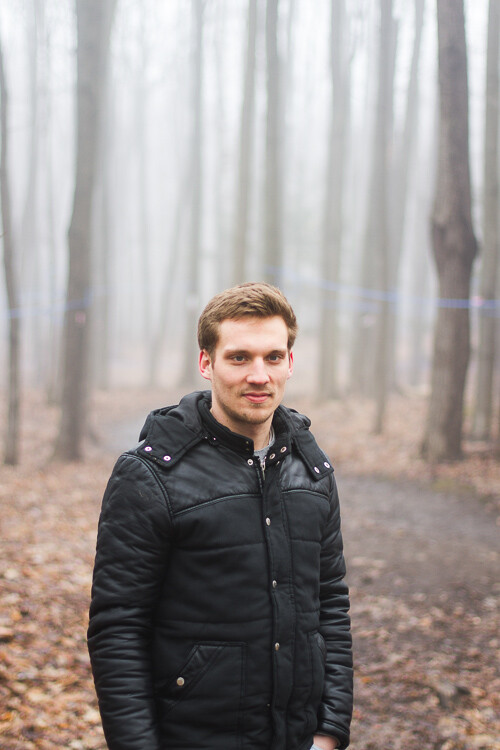
Humans are symmetrical, so when I’m after a strong effect, I’ll ask my subject to face directly toward or away from the camera, like this:

Notice how the subject’s back is perfectly aligned with my camera sensor, and how even the lines of his shirt add to the symmetry. (No, his head isn’t angled for exact symmetry, but that was deliberate; by slightly subverting the symmetrical effect, I prevented the composition from becoming overly static.)
Even if you don’t have (or can’t find) a symmetrical subject, you still have a second option:
You can find a nice reflective object, then position your camera so half of the scene is real while the other half is reflected. It often pays to put the line of reflection in the center of the shot, though you can always position it along a rule of thirds gridline for a slightly more unconventional result.
These days, reflective symmetry is very popular among serious photographers, who rely on all sorts of reflective objects for stunning effects, such as:
- Car windows
- Car hoods
- Metal buildings
- Quiet lakes
- City puddles
- Car mirrors
- Smartphone screens
Really, when it comes to reflection photography, the only limit is your imagination and resourcefulness. (In fact, some photographers even carry bottles of water to create puddles when needed!)
4 tips for stunning symmetrical pictures
Now that you’re familiar with the symmetry basics, I’ll share my favorite tips for improving your symmetrical compositions:
1. Don’t be afraid to get close
When you’re creating symmetrical compositions, the closer you get to your symmetrical subject or reflective object, the more obvious the symmetry becomes…
…and more obvious symmetry makes for an intensified effect.
You see, if you use a wide-angle lens or shoot from a distance, it’s easy to lose instances of symmetry in the overall composition. Plus, the more you include in the frame, the more likely it is that the symmetry will be broken by some element, which in turn will weaken the effect.
So if your goal is to capture an in-your-face shot, get close – either by walking nearer to your subject or by using a telephoto lens. In fact, if you can, try to fill the frame with obvious symmetry.
Take a look at this image, which features a symmetrical subject (doing a relatively symmetrical pose) as well as a semi-symmetrical background:

But while the symmetry is nice, the wider perspective takes away from the effect; the result is much improved with a telephoto focal length:
2. Minimalism is your friend
Minimalism is a photographic style that features clean – even empty – backgrounds, simple subjects, and decluttered surroundings.
And when doing symmetrical photography, the more you can simplify your shot (that is, the more you can go minimalist), the better it will turn out.
After all, a simplified composition will make your subject the center of attention, which is pretty much always a good thing.
But how do you create minimalistic shots?
Start by looking around the scene and doing what you can to cut out distractions, either by physically removing them from the composition or by adjusting your camera angle. (For instance, try moving your camera slightly left, right, up, and down; you’d be surprised by how helpful these tiny movements can be!)
You might also look for large swathes of negative space and see how you can incorporate them into the scene. For instance, by getting down low, you can often bring a blank white or blue sky into the frame.
Personally, I like to widen my aperture to f/4, f/2.8, or wider; that way, I can create a soft-focus effect that turns the background into soft and creamy bokeh.
When shooting this lantern, the background threatened to weaken the symmetry effect:

So I used a wide aperture to blur it into oblivion. The final result is much more pleasing, and the symmetry of the lantern is far more obvious:

3. Experiment with off-center compositions
Throughout this article, I emphasized the value of centralized symmetrical compositions.
And it’s true:
If you put symmetrical subjects smack-dab in the middle of your photos, then you’ll get dramatic, interesting results.
But sometimes it’s best to take your symmetrical compositions in a different direction, especially if you want the power of symmetry while also gaining the dynamism of an off-center structure.
If you do go for decentered symmetry, I’d recommend you avoid working with symmetrical subjects and instead compose with symmetrical scenes (e.g., a tree reflected in the water or a street reflected in a building facade).
(In my experience, when you decenter symmetrical subjects, the symmetry tends to fade into the background and you lose most – or all – of its power.)
So simply find a reflected scene, then instead of positioning the line of symmetry in the center of the shot, position it slightly higher, lower, right, or left. Here, the rule of thirds can be a big help – in fact, you can use an off-centered composition to satisfy both the rule of thirds and the symmetrical technique. Make sense?
4. Crop for perfect results
My final suggestion is a quick one, but it’s extremely important if you want to create polished, professional symmetry pictures:
Always, always, always import your photos into a program like Lightroom. Then do a final symmetry check – and if the symmetry isn’t perfect, apply a bit of quick cropping.
(Is perfect symmetry always essential? Not if you’re after a more unconventional effect, as I described in the previous section. However, if your goal is to capture a stunningly symmetrical shot, then a slightly asymmetrical subject will significantly dampen the effect.)
I use Lightroom for this, which offers a handy rule of thirds grid; as you can see in the example below, I try to line of elements of my subject with the rule of thirds gridlines:

That said, you don’t need to do this final crop in Lightroom. Programs such as Capture One, Luminar Neo, and Photoshop are all perfectly acceptable. You can even do this step in a free smartphone app; the point is to spend time scrutinizing the image for perfect symmetry, then do what you can to fix any mistakes!
Symmetry in photography: final words
Now that you’ve finished this article, you should know what symmetry is all about – and how you can incorporate symmetry into your own photos for stunning results.
So practice locating symmetrical objects and scenes. Practice working with different compositions. And above all, have fun!
Now over to you:
What type of symmetrical photography do you plan to do? Do you have any tips of your own? Share your thoughts in the comments below!


