
Interior architectural photography is a sought-after skill; you can use it to create eye-catching real-estate shots, images of businesses, and even historical documentary photos. But shooting interiors isn’t exactly a walk in the park. It comes with plenty of challenges, including cramped spaces, low light, and difficult camera techniques.
Fortunately, I’m an experienced interior photographer, and in this article, I share my top six tips to ensure success, no matter your skill level. I discuss:
- The best focal lengths for interior architecture
- The equipment item that you absolutely must own
- Easy ways to improve your compositions
- Much more!
So if you’re ready to level up your interior shots, then let’s dive right in!
1. Always use a tripod

Whenever you shoot interiors, you absolutely must use a tripod. This is for a few main reasons:
First, a tripod will stabilize your camera/lens setup, which dramatically reduces the possibility of camera shake. Since interior shots tend to be taken at narrow apertures and slow shutter speeds, keeping your camera on rock-solid support is essential.
Second, if you use a tripod, it’s much easier to make sure your camera is level. (While I discuss the importance of a level camera later on in this article, it’s a fundamental part of pretty much all architectural photography.)

Additionally, there’s no good reason not to use a tripod when photographing interiors. Sure, if you were tracking subjects or needing to constantly change your position on the fly, a tripod would be a hindrance. But architectural photography is slow and deliberate; since your subject matter is buildings, you can always count on it to sit nice and still while you set up your camera, dial in various settings, and fine-tune your composition.
Note that interior photoshoots tend to involve very little wind, rushing water, or rain, so you can often get away with using a cheaper tripod (though there are also reasons to invest in a good sturdy model, including gear safety, so make sure you choose your model very carefully!).
2. Whenever possible, use a flash
If you shoot a room without a flash, you’ll typically get shadows scattered around the room (caused by artificial lighting positioned along walls and at various places across the ceiling). This often doesn’t look great and can be difficult to handle from an exposure perspective, so I encourage you to use a bit of flash. You only need one or two speedlights or strobes, and they’ll help balance the exposure across the entire frame.
Here’s what I recommend:
Make sure your flashes are mounted on separate tripods or stands (they shouldn’t be on your camera!), and place them a few feet off to the side and a foot or so behind your camera. (If you’re using two flashes, make sure they’re on opposite sides.) Aim the flashes so they point toward the ceiling and slightly away from the room you’re shooting.
Set the flashes manually at half power (a stop below full power) and fire away. Given the angle, the light from the flashes will illuminate the room indirectly (i.e., bouncing off the ceilings and walls), and you’ll get a soft, even fill light for the room you’re shooting.
I always encourage you to review the resulting image on your camera’s LCD and make changes accordingly. Watch for strange shadows, too-bright walls, dark corners, and reflections from the flash in windows and other glass objects.
3. When shooting whole rooms, don’t go too wide
When I first started taking architectural interior shots, I used the widest-angle lens I could get my hands on. I thought that with an ultra-wide lens, I could get more of the room in the frame – but while I was technically correct, more isn’t always better. I soon noticed a high level of distortion toward the edges of the frame, especially in smaller rooms, and I determined that ultra-wide focal lengths (i.e., 14mm) make the sides of the frame look oddly stretched and off the horizontal plane, even when corrected in post-production.

So I experimented with different focal lengths and found that an effective focal length between 21mm and 28mm gives you a very nice balance; at 25mm, you get limited distortion and a wide-enough frame to capture the character and presence of the scene.
One option is to grab a 24mm prime, which can be very cost-effective when you’re just starting out (most manufacturers offer a high-quality 24mm lens for cheap). Alternatively, you might invest in a 24-70mm zoom – yes, it will cost a lot more, but it’ll offer extra flexibility and even allow you to capture some nice detail shots in the 50-70mm range. If you do prefer a wider perspective, you could look into a 16-35mm zoom instead.
By the way, if you’re in a situation where 21mm won’t capture enough of the scene, a panorama is always an option. Speaking of which:
4. Try panoramas for ultra-wide shots
Panoramas are a great way to capture an entire room, especially if you’re using a longer lens or you’re dealing with a cramped interior. But how can you create one?
Start by setting up your camera vertically on the tripod. Many photographers think it’s best to do panoramas horizontally, but the vertical orientation will give you a taller image.
Then do your best to pivot your camera while taking a series of images. Determine your start and end point in advance, and make sure that you have plenty of overlap between compositions. Using a tripod is essential, and it’s important that you rotate your camera on a perfectly level horizontal plane – with the pivot point being roughly where the lens meets the camera). Note that, if the pivot point is too far forward (i.e., somewhere on the lens) or too far backward (i.e., on the body of the camera), the panorama will appear distorted.
For the picture below, the pivot point was on the body of the camera, which is behind the ideal spot. As a result, the shot has a weird sort of convex distortion:

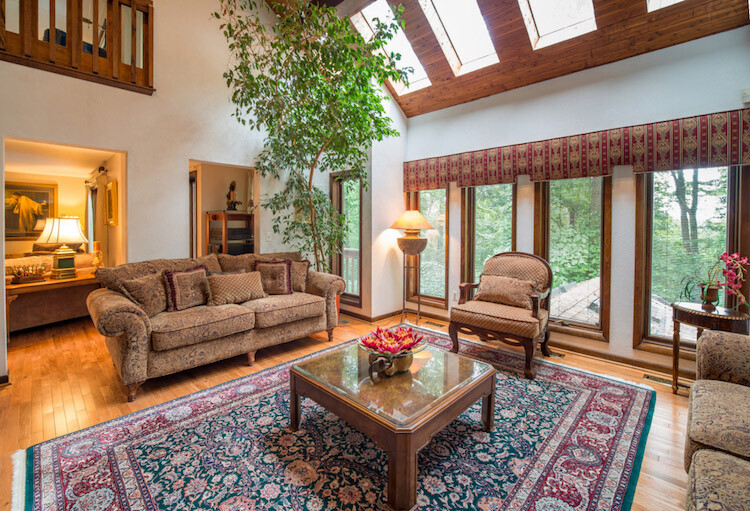
5. Whenever possible, try to shoot only one or two walls
Beginner interior architectural photographers sometimes try to squeeze too much into the frame by including three or even four walls – but when you use this approach, the shot will often appear rather awkward-looking (if you aren’t extremely careful with the composition, that is).
Instead, go for a one- or two-wall shot, which will give the viewer the most geometrically pleasant image to view:

The shot displayed above is a generic two-wall scene with the walls meeting at a standard 90-degree angle. Looks nice, right? Well, I also took a second shot, where I backed up several feet to deliberately include the third wall on the left edge of the frame:

I don’t know about you, but to me, the third wall makes the photo look compositionally awkward and disorienting. I much prefer the two-wall version, and I recommend you pay careful attention to the number of walls you incorporate into your photos.
That said, including three walls in a shot is sometimes okay, provided that everything is geometrically aligned:

6. Make sure your camera is perfectly level
Last – but definitely not least – you should work as hard as possible to ensure your camera isn’t tilted up, down, left, or right when shooting. Even the slightest tilt will require post-production cleanup, and you’ll lose pixels in the process.
Here’s an example of what I’m talking about:

See how slanted the windows are? They lean outward, which is a sign of perspective distortion. Clearly, this is not an accurate depiction of the room; instead, it’s the result of the camera being tilted ever-so-slightly downward.
But once we get the camera nice and level, here’s the result:

As you can see, keeping your camera level makes a huge difference. Happily, there are a couple of ways to help you get your camera perfectly straight when you compose your photos. Most cameras have a built-in level (with the built-in level activated, when you look into the viewfinder, you’ll see lines across the focusing screen that tilt when the camera tilts). If you’re not sure whether your camera has this option, take a peek at the manual or do a bit of Googling.
You can also use a bubble level that slides onto the camera’s hot shoe. (When the little bubble is centered, it means your camera is level.) You can buy one of these levels at just about any photography store for just a few bucks, and it’s my preferred solution because it tends to be more accurate than built-in camera levels).

Interior architectural photography tips: final words
Shooting interiors often comes with difficulties, and getting good at interior photography isn’t always easy.
However, with the tips I shared above plus some practice, you’ll be capturing stunning photos in no time at all! Just remember that you should never rush your images. One of the great things about architectural photography is that your subject will never move, so you have time to really slow down and deliberately refine each shot.
Now over to you:
Which tips do you plan to use first? Do you have any additional advice for capturing stunning interior images? Share your thoughts in the comments below!
Table of contents
Architectural Photography
- GENERAL
- 6 Helpful Tips for Doing Interior Architecture Photography
- PREPARATION
- SETTINGS
- LIGHTING
- COMPOSITION
- GEAR
- ADVANCED GUIDES
- CREATIVE TECHNIQUES
- POST-PROCESSING
- INSPIRATION

